This is an old revision of the document!
Table of Contents
Electronic engine management / Megasquirt
A controversial topic among TR6 friends…I just wanted to finally tackle it:
I've been struggling with electronic injection since my Kawasaki Z1100 GP (built in '81) and already wanted to install a Megasquirt injection system in my Suzuki TL1000R (which failed in the early 2000s due to a lack of available hardware and software), so now I've done it on my TR6:

Basics:
A big praise and thanks go to Andreas, who is one of the pioneers with the Megasquirt on the TR6 and saved me a lot of work and learning money and without whom the conversion would not exist…
Thanks also to Sascha, who was available as a sparring partner.
And last but not least to Harry, who put up with the crying…
An electronic engine management system (hereinafter referred to as “EFI”) basically doesn't give you any more horsepower than you have with a perfectly adjusted PI system or carburetors (e.g. triple Weber)…
What you get is:
A proper ignition spark in every (!!1elf) situation and always the right mixture….and that usually brings more power than can be achieved with “analog” technology, because hardly anyone gets it perfectly adjusted….
If I set the ignition timing on the EFI to 11.4° from TDC, then it sparks at 11.4° before TDC…. and doesn't wander between 11° and 13° at idle, doesn't change depending on whether I'm revving up or down (keyword: timing chain) or the distributor shaft bobbles because the guide is worn out…
I also always have optimum charging time of the coil….egal, whether at 800 rpm or 6000 rpm…is simply not feasible with a contact ignition!
You can read below which control and hardware components are available and why I chose them…..
Hardware:
Control unit / ECU
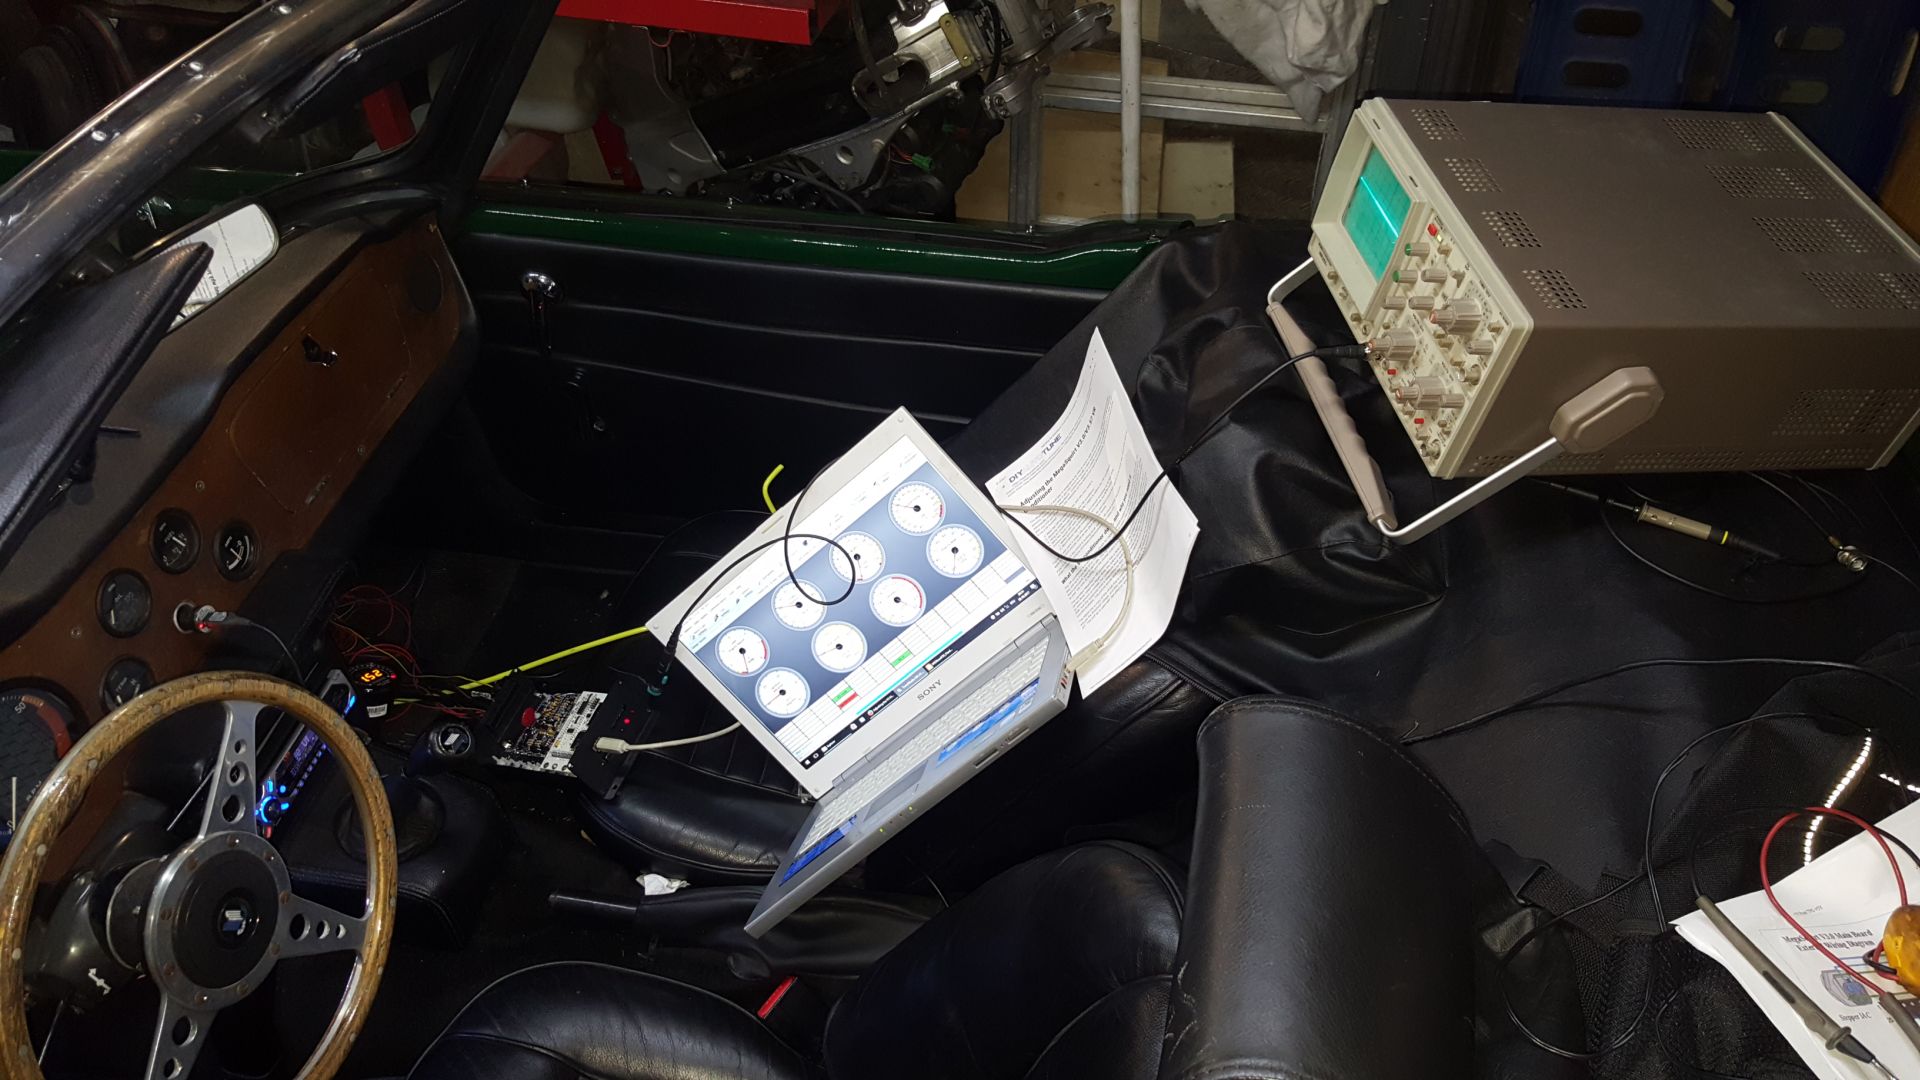
I bought a “MegaSquirt-III with PCB V3.0 Kit” from https://www.diyautotune.com and built it up… To be able to test the whole thing before installation, there was also a JimStim v1.5 from the same source …. Highly recommended!
There's not really much to write about this: Print out the assembly instructions and work through them step by step…
All you need is an 80-watt soldering station, some good solder and a small side cutter…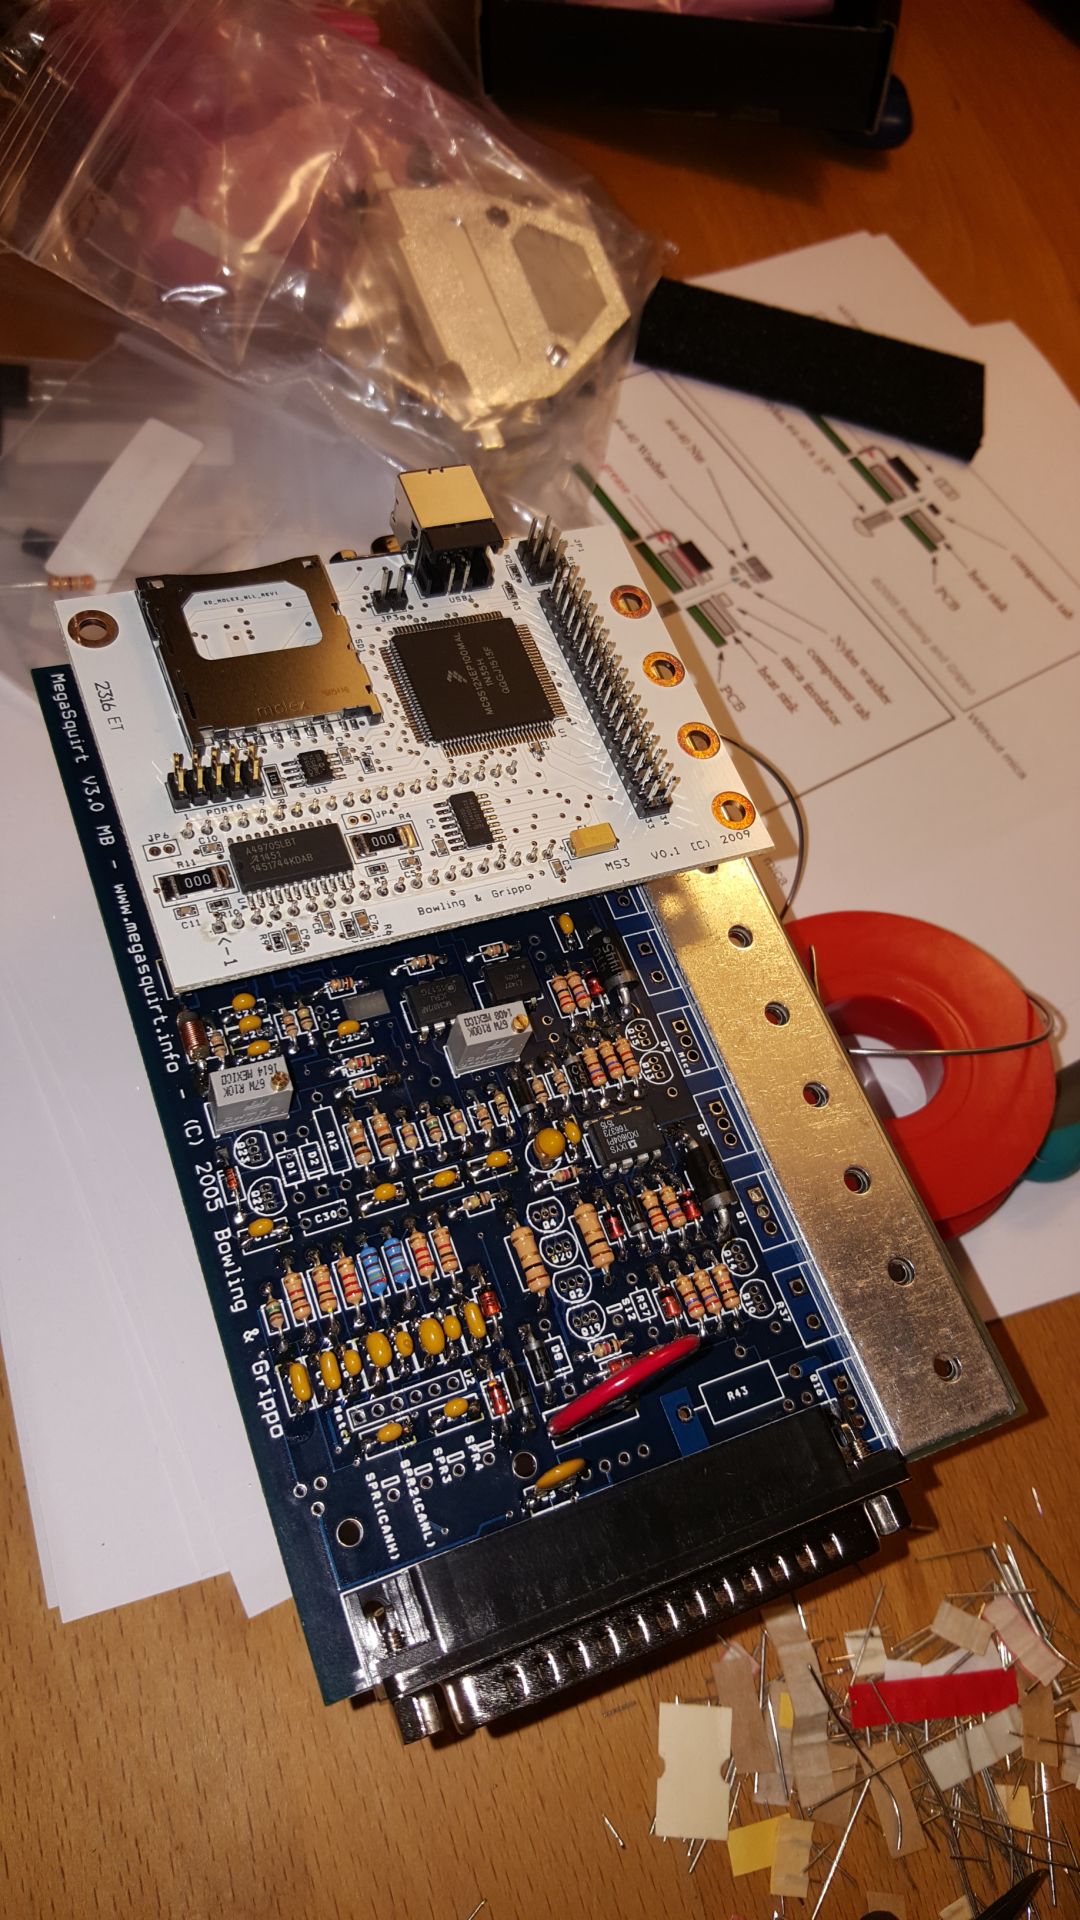
In the meantime, I have to admit: An MS2 would have done as well and would have been easier to set up…With the MS3, however, you have the option of implementing sequential injection and other gimmicks. For example, I have two modes: “fuel saving” and “fun”, which I can select via a switch
Alternative engine management computers are for example (in random order):
https://www.efignition.nl/
https://speeduino.com/wiki/index.php/Speeduino
http://no-limits-motorsport.de/shop/category.php?id_category=28
https://trijekt.de/
If you want to try it yourself, I recommend the Megasquirt and one of the top three….

Triggerwheel
I used a 6.5 inch 36-1 tooth wheel from http://trigger-wheels.com/store/contents/en-uk/p5.html as the trigger wheel for detecting the crankshaft position…I also ordered the crankshaft sensor and a fuel injector connector kit here…. A friend combined the whole thing with a new pulley and balanced it for me…now has the same weight as the original pulley…just with “teeth” Essential component, without which (almost) nothing works….You just have to find out somehow where the pistons are in order to be able to inject and ignite correctly… If necessary, this can also be done with a signal from the ignition distributor…but then without ignition control….
Pump
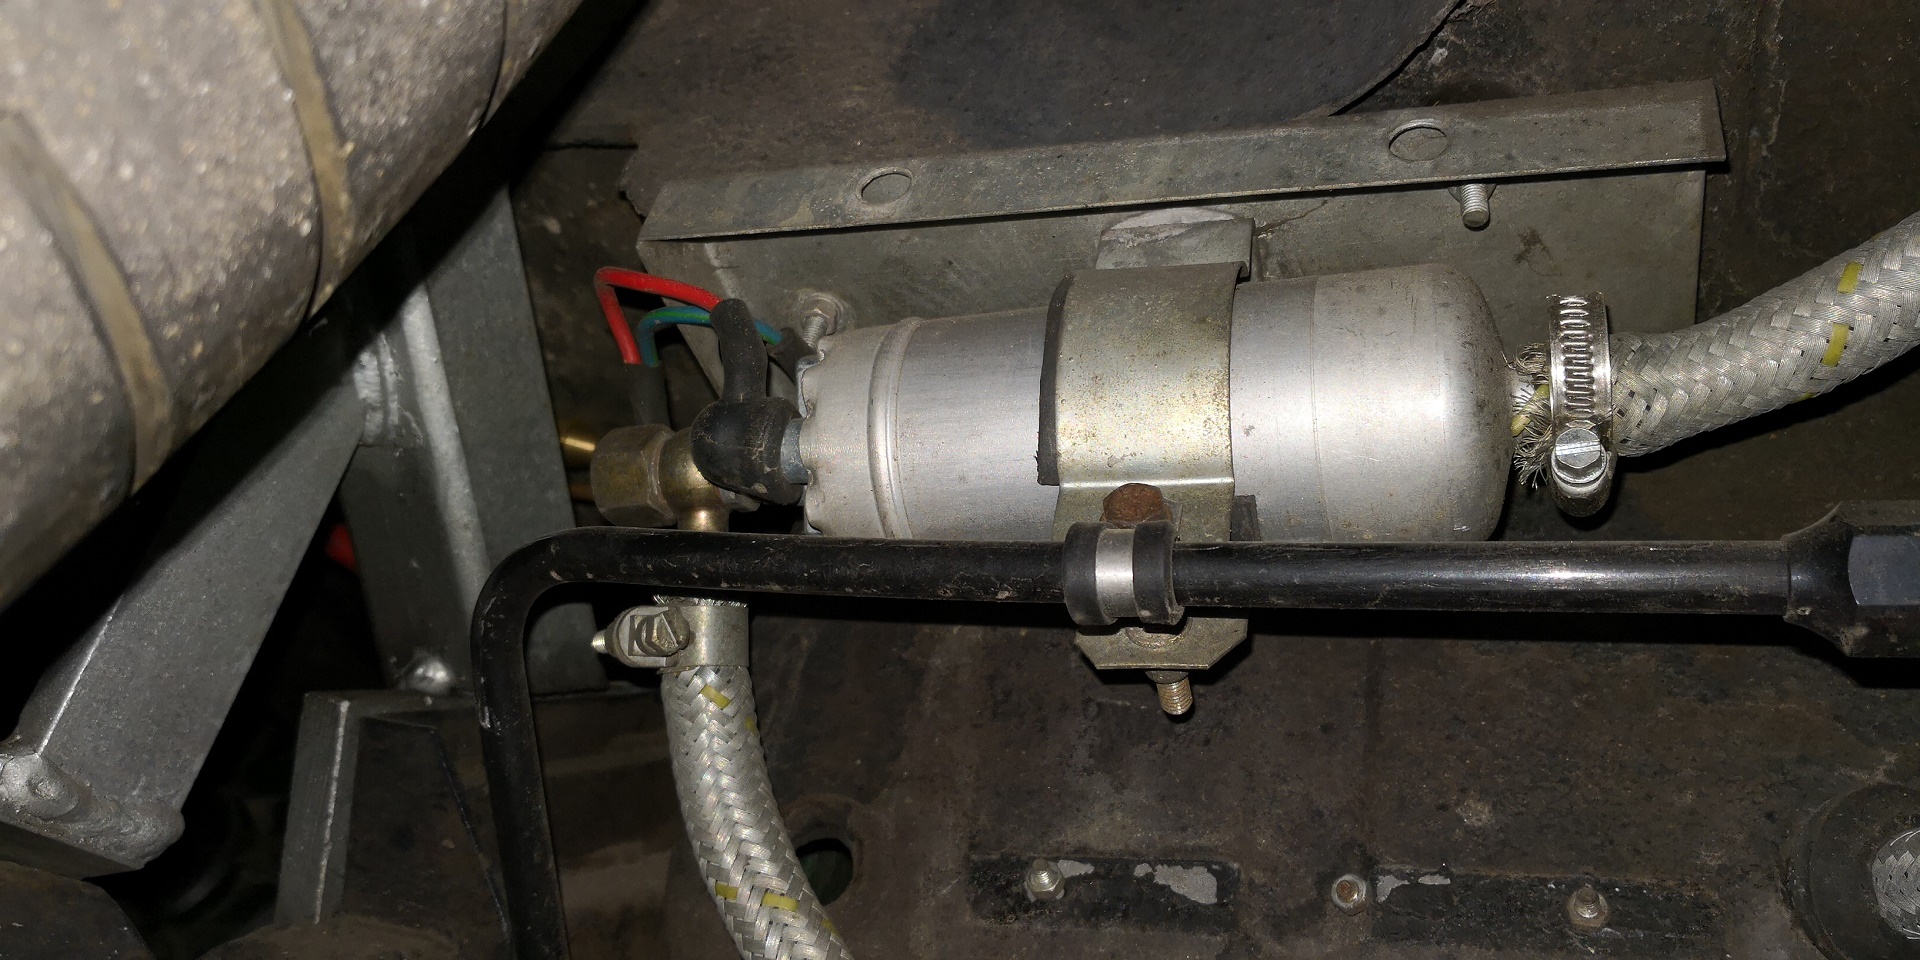
Here I use an original BOSCH fuel pump 0 580 254 950 from a Mercedes Benz series W124
15mm inlet and lowest power consumption at the required pressure
Nevertheless, I will still convert it to PWM control…is no problem together with a pressure sensor and the Megasquirt…
Update: The PWM control works (alone) and has to be, after a measurement at idle on the return from the pressure regulator → tank showed 120L/h…
This is definitely too much and only leads to heating of the fuel, which you don't want! I will reduce it to max. 80L/h or have it completely regulated by the MS…there has to be a minimum quantity at the return flow so that the fuel rail always has cool fuel…
Plumbing
Pipes:
https://www.sandtler24.de/goodridge-aluminium-rohrleitung-800001.html 4 meters cost 20,- you need 2 pieces… Plus the matching Dash6 fittings…either also from Sandtler, or from Arlows
The two lines / hoses run parallel to the brake line under the car and are heat-insulated accordingly

You should include a fuel cooler in the return line, which is mounted before the water cooler… http://www.x-parts.de/Kuehlung/Kraftstoffkuehler/Kraftstoffkuehlung-Kraftstoffkuehler::2515648.html
I didn't install one and didn't have any problems even in summer 2018… Possibly interesting when driving over mountain passes.
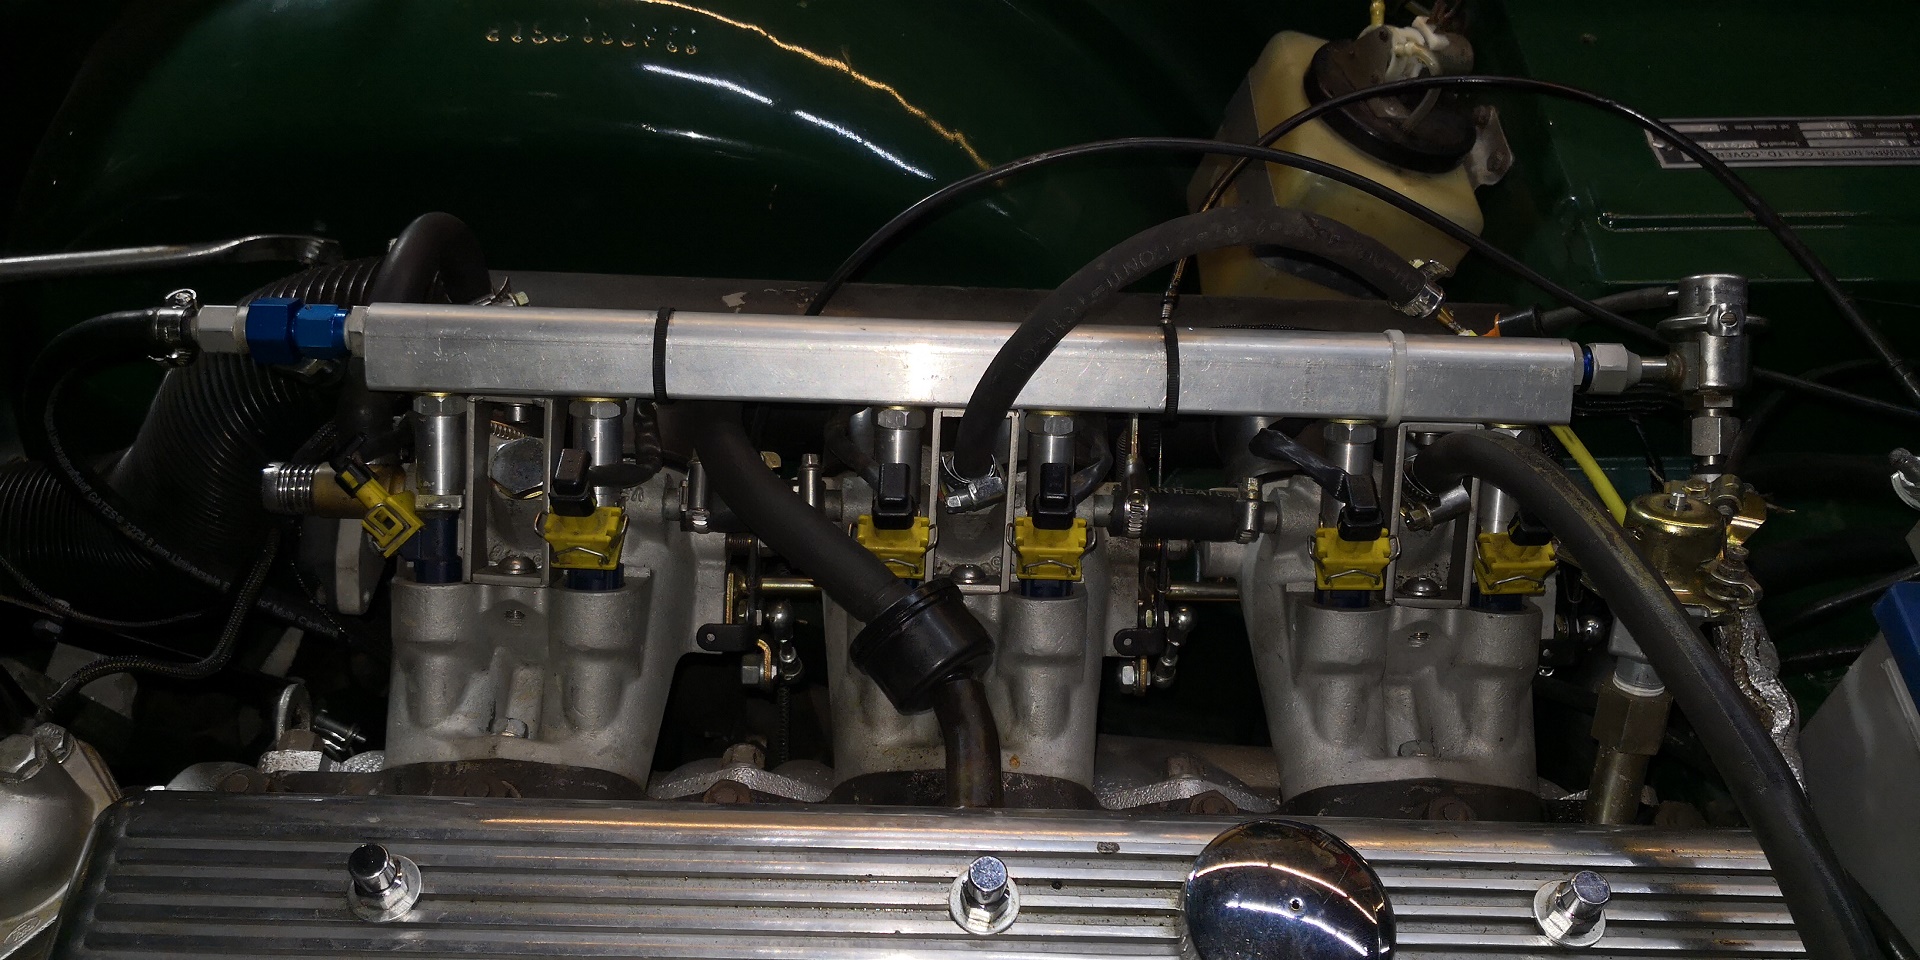
Injectors
come with mri from the Opel Omega V6…are available used from 25€ in the bay….25€ per set! if you use an injection nozzle calculator (e.g. http://cft-motortec.de/cms/einspritzduesenrechner.html ) you will find out that you need nozzles around 150cc/min at target fuel pressure…the Opel ones deliver 208cc and are therefore almost “too big”, because you can't get a proper mixture at idle if the opening times are too short…
Throttle boddies
There are various options here… The most “original” way, which I also took, is to extend a throttle valve system from the TR5/6 PI with a throttle valve sensor and to enlarge the bore for the injection nozzles. The seal and seat for the old injectors remains untouched and the whole thing can be removed without leaving any residue….

Suitable solutions are required for carburetor engine conversions. These range from spacers that go between the carburetor and intake manifold and hold the injection nozzle (https://www.classicfuelinjection.co.uk/su-and-stromberg.htm ) to complete throttle valve systems costing thousands of euros https://www.limora.com/de/englische-marken/triumph/triumph-tr5-tr250-und-tr6-1968-1976/tuning-zubehoer-und-accessoires/vergaser-und-einspritzanlage/umbausatz-653106.html
Many offerings are based on intake manifolds for Weber DCOE carburetors and correspondingly designed throttle bodies with injection nozzle mounts. This goes as far as DCOE “replicas” that are difficult to distinguish from carburetors: https://store.jenvey.co.uk/throttle-bodies-and-components/throttle-bodies
 Another way is the single throttle valve, which is also used in many everyday cars due to its simple design:
But it is not without reason that people like Ferrari/Lamborghini etc. used to install Weber twin carburetors (one throttle/cylinder) or today single throttle systems like in the BMW M5…. Throttle response etc. is completely different to that of a single throttle valve….
But it's all a question of money…
https://www.borlainduction.com/2900-series.html
https://shopbhp.com/collections/throttle-bodies/products/triumph-tr6-throttle-body-kit
Fuel pressure
At 3.5 bar, it is well below the operating pressure of the old Lucas injection system of 7.5 bar. If you buy a complete Opel intake manifold, the matching fuel pressure regulator is usually included, which should be connected in parallel to the air pressure sensor. Background: When the throttle valves are closed/high vacuum, the fuel pressure is lowered. This allows longer injection times to be achieved at idle…better for the mixture formation…
Ignition
The original distributor is used here…only the ignition coil is now fired by the ECU and no longer by the contact in the distributor… So you have the precise timing of a static ignition with the look of the original… Alternatively, you can also use the 6-pin ignition coil from the VW Golf VR6, for example… Even better (because more “fump!”) is a CDI (Capacitor Discharging Ignition) such as MSD 6, where the coil is charged with 430 volts and you get 95mJoul ignition spark…
Especially with the TR5/TR6PI, the freely programmable ignition is the biggest step forward, as the original PI only works with a speed curve and the accelerator pedal position (vacuum) is not included in the ignition timing. This has to do with the modest vacuum situation due to the 280° camshaft, which only generates a low vacuum anyway, which then quickly collapses when you accelerate. That's why Triumph/Lucas have dispensed with vacuum adjustment.
If you feel like it, you can even install a knock sensor and go to the limits of pre-ignition without destroying the engine.
Sensorik:
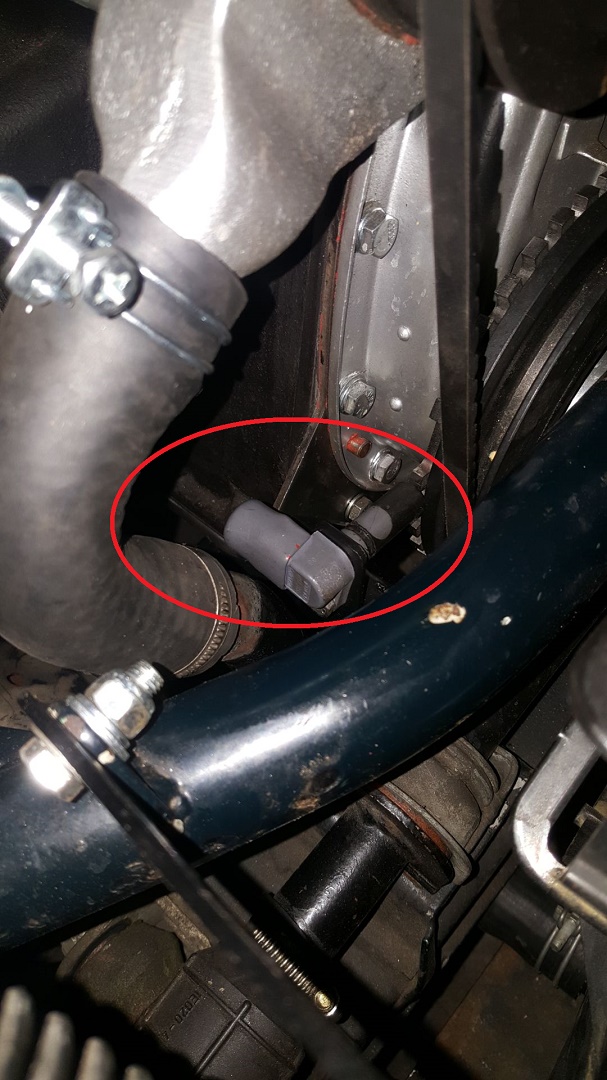
Kurbelwelle
Der Kurbelwellensensor ist ein Standardteil, welches mit nem selbstgestrickten Halter an den Schrauben des Steuerkettenkastens befestigt wurde und das Triggerwheel detektiert..
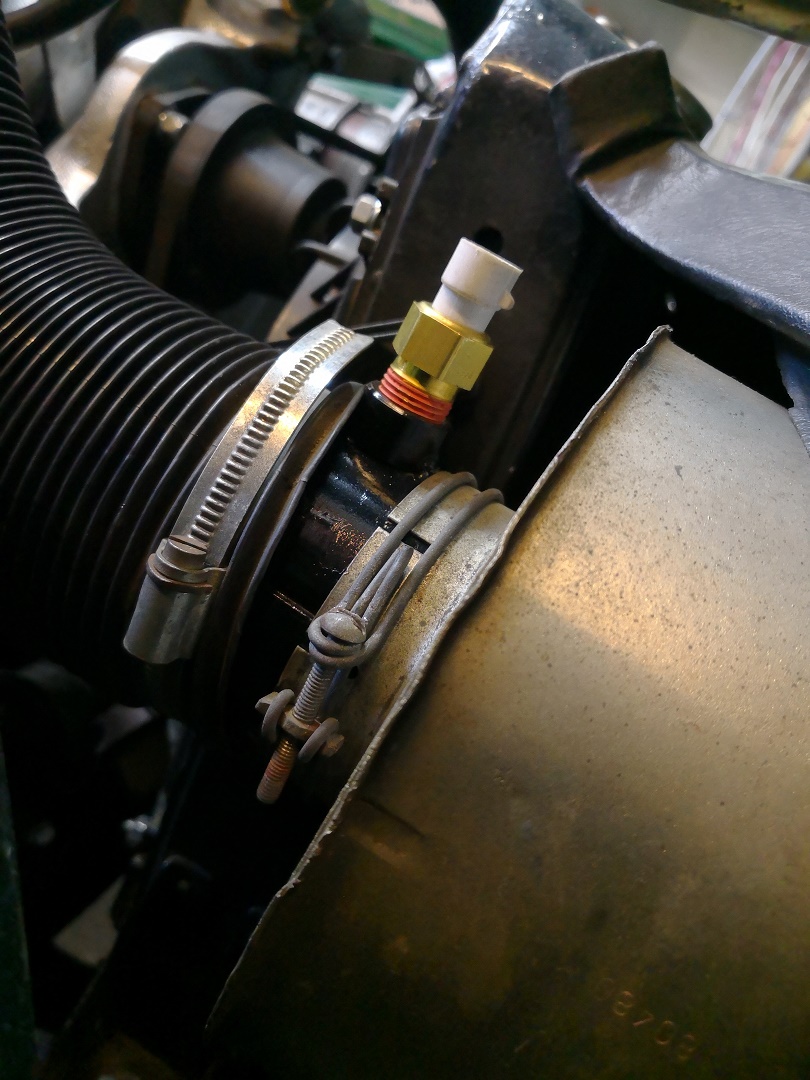
Wassertemperatur
 Als Coolant Temperature Sensor (CLT) hab ich nen GM Sensor mit der Megasquirt mit bestellt, da man in Deutschland meist nur welche mit M12x1,5 Gewinde bekommt…wir brauchen aber 3/8“ NPT…
Dieser muß lediglich ein wenig abgedreht werden und findet seinen Platz im Wasserpumpengehäuse im Abgang der “Vergaserheizung”, der beim PI normaler Weise mit einem Stopfen verschlossen wird…so hat man immer die genaue Wassertemperatur aus dem “kleinen” Kreislauf und bekommt keine Störungen über die originale Anzeige in´s System…
Als Coolant Temperature Sensor (CLT) hab ich nen GM Sensor mit der Megasquirt mit bestellt, da man in Deutschland meist nur welche mit M12x1,5 Gewinde bekommt…wir brauchen aber 3/8“ NPT…
Dieser muß lediglich ein wenig abgedreht werden und findet seinen Platz im Wasserpumpengehäuse im Abgang der “Vergaserheizung”, der beim PI normaler Weise mit einem Stopfen verschlossen wird…so hat man immer die genaue Wassertemperatur aus dem “kleinen” Kreislauf und bekommt keine Störungen über die originale Anzeige in´s System…
Lufttemperatur
Als Intake Air Temp Sensor (IAT) kommt ein “Open Element” Sensor von GM zum Einsatz, der deutlich schneller reagiert als der oben erwähnte CLT. Für diesen braucht man einen https://www.diyautotune.com/product/3-8-npt-stainless-steel-weld-on-bung-for-iat-or-clt-sensor/, um ihn am Halter des Luftfilters verschweißen zu können….
Unterdruck
Hier kommt der im Kit mitgelieferte MPX4250 zum Einsatz, der mit 4mm Druckleitung von No-Limits-Motorsport und nem selbst gelöteten Adapter am Unterdruckanschluß des mittleren Drosselklappenkörpers hängt.
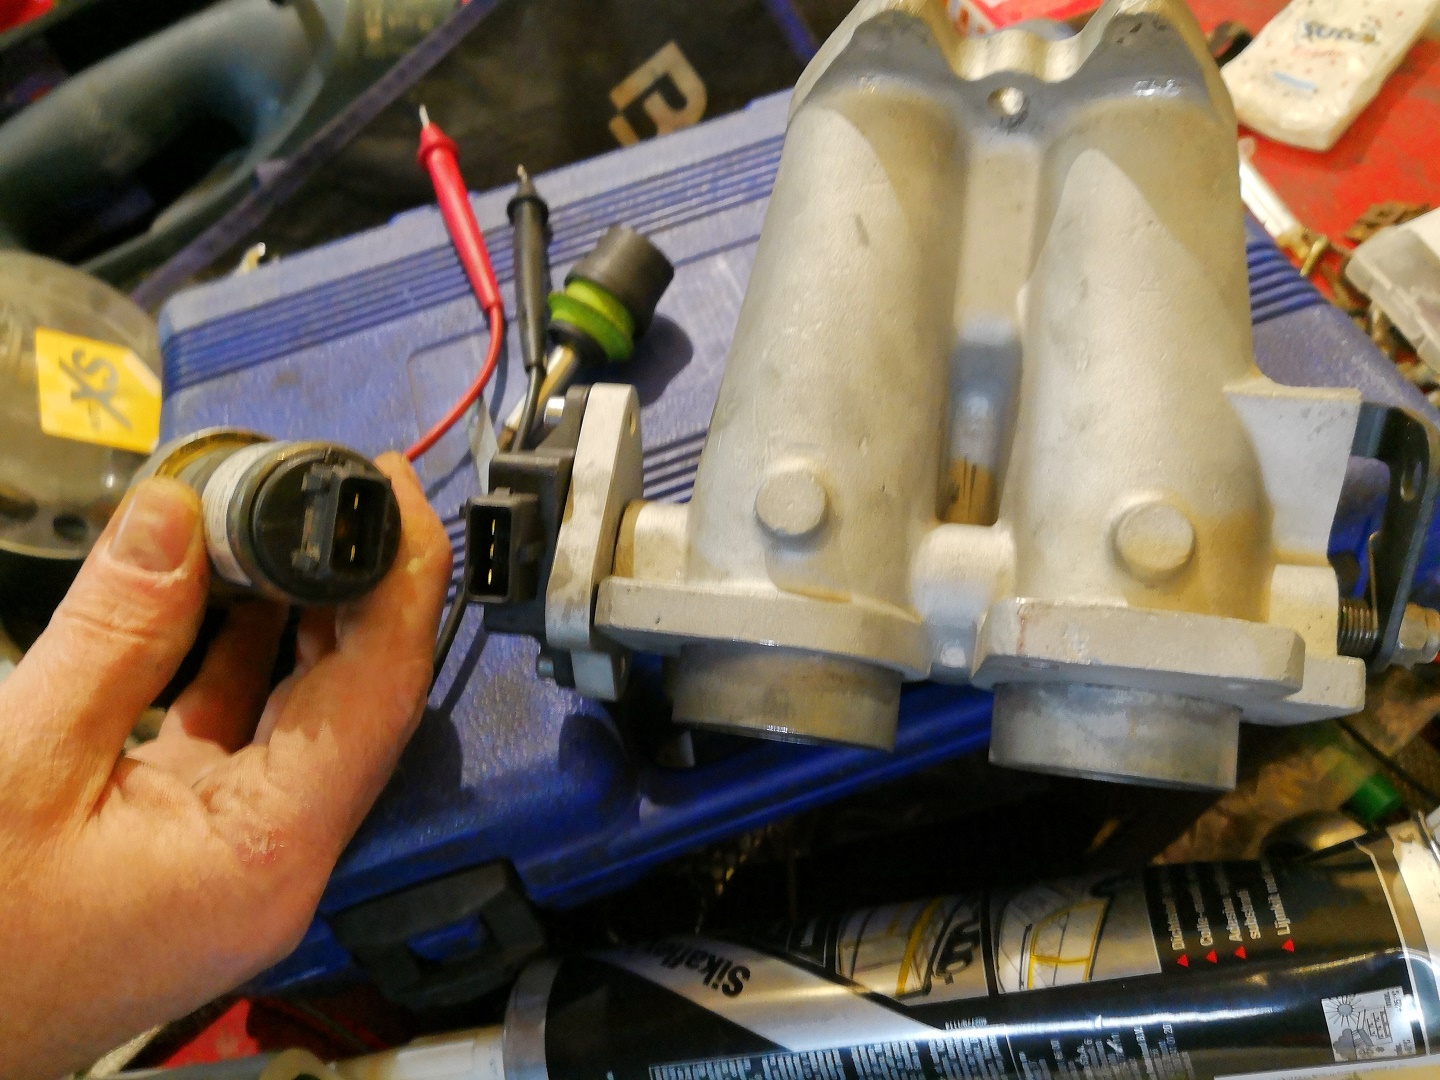
Drosselklappensensor
Als Throttle Position Sensor (TPS) kommt ein Ford Standardteil zum Einsatz, welches mit nem Halter auf der verlängerten Welle des vorderen Drosselklappenkörpers sitzt…
Lambdasonde
Hier nutz ich die Innovate MTX-L mit Bosch LSU 4.9 weiter, die ich schon zur Abstimmung der Lucas-Einspritzung genutzt habe…für die Megasquirt reicht auch eine Spartan2 Controller mit LSU 4.9 Sonde. Um die Sonde zu befestigen, wurde seiner Zeit ne passende Muffe in den Krümmer geschweißt…wichtig ist der Winkel, damit Kondesnwasser aus der Sonde laufen kann….also bitte im oberen Halbkreis des Rohres montieren…sonst kann Kondenswasser nicht raus laufen und sie hält nur 1 Monat…

Kabelbaum
Hier würd ich mich an die Kabelfarben aus der offiziellen Doku halten. Ich hab meine Kabel + Schutz-Schläuche bei Peter Böllmann von http://no-limits-motorsport.de vor Ort als Meterware gekauft…wollte mir seinen Laden eh mal anschauen… Ansonsten ist aber auch der fertige Kabelbaum von Ihm http://no-limits-motorsport.de/shop/product.php?id_product=100 empfehlenswert. Für die anderen EFIs gibt´s meist auch fertige Kabelbäume mit losen Enden, die man dann nur noch an die jeweiligen Sensoren legen muß…
Software:
Programmierung / Parametrisierung
1. Man braucht nen Laptop….ich möchte die Auto-Tune-Funktion der Software Tunerstudio von EFI Analytics nicht mehr missen…
Entweder man hat nen lang laufenden Akku oder besorgt sich nen passenden Autoadapter für die Stromversorgung…auch wird vor jeder Änderung ein Backup der Settings erstellt, so daß man immer wieder auf ne funktionierende Config zurück gehen kann
2. Verbunden wird die Megasquirt über eine Serielle Verbindung…..entweder per (USB-)Kabel oder per Funk… Ich hab mir für 5,-€ bei Ebay ein HC-06 Bluetooth Modul besorgt…nachdem ich es geschafft habe, die Verbindungsgeschwindigkeit des Moduls auf 115200 BAUD umzustellen, funktioniert das Prima…
3. zusammen mit dem Bluetooth-Modul läßt sich die Megasquirt auch über´s Smartphone/Tablet kontrollieren….Programmieren möchte ich das damit nicht…aber während Google Maps im Hintergrund navigiert, kann man sich nen paar bunte Balken anschauen…
Bluetoothmodul
Oben erwähntes HC-06 ist gut und günstig…leider ist die im I_Net zu findende Dokumentation nicht immer Up-to-date…mit der neuesten Firmware haben sich leider die AT-Befehlssätze geändert, um das Modul auf die für unsere Zwecke benötigte BAUD-Rate von 115200 einzustellen (Das Ding läuft per Default mit 9600)
Modul per USB ↔ Serial-Adapter oder - falls noch vorhanden - COM-Port an den PC anschließen und mit Teraterm per Copy + Paste die Befehle:
AT+NAME:wunschname setzt die Kennung auf “wunschname”
AT+PSWD:“0000” setzt den PIN auf 0000
AT+UART=115200,0,0
senden… Alle befehle müssen mit einem “OK” quitiert werden…
Danach die Verbindung unterbrechen und neu aufbauen…jetzt allerdings mit 115200 BAUD… ein “AT” sollen ein “OK” liefern…